
You’re probably familiar with UTMs and how powerful they can be for creating targeted marketing campaigns.
But did you know that Facebook has its own version of these for tracking outbound links from ads run on their platform?
They’re called FBCLIDs, and you may be wondering what the heck they are.
If you’ve spent any time in your Google Analytics dashboard, you’ve probably seen them—a long string of alphanumeric code at the end of what seems to be a duplicate URL.
Not to mention that TikTok now has its own version of these, too, a TikTok Click ID (TTCLID) for improving ad attribution and performance through campaign association.
In this blog post, we’ll give you the rundown on what Facebook Click Identifiers (FBCLIDs) and TikTok Click IDs (TTCLIDs) are, how they affect your Google Analytics, a general overview of UTMs, and how to use all of them for personalized website experiences.
What The Heck are TTCLIDs?
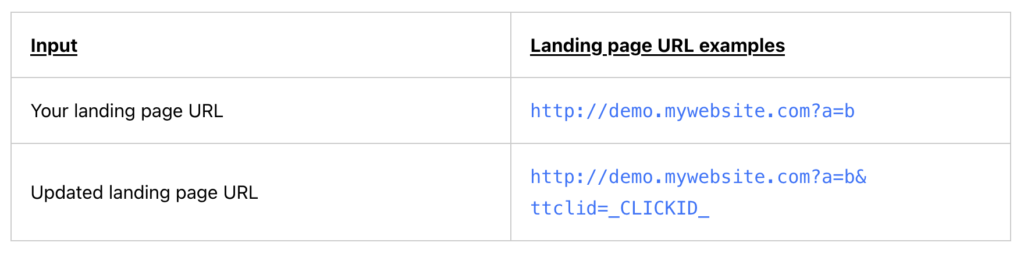
TTCLIDs or TikTok Click IDs are tracking parameters appended to a landing page URL whenever a user clicks an ad on TikTok. They started gradually rolling out this auto attachment on 11/17/22. TikTok says that when advertisers share a triggered web event via the Pixel or Events API with TikTok and the event has a click ID—TikTok will match this up. Then that information can be used for audience-building, attribution, optimized ad delivery, measurement & more.
TikTok claims TTCLID auto-attachment does not impact other custom tracking parameters you use. It is also possible to remove the TTCLID from landing page URLs like how you manage other query parameters with the steps outlined here.

What The Heck are FBCLIDs?
In short, FBCLIDs or Facebook Click Identifiers are tracking parameters automatically added to outbound links on Facebook.
So, if a Facebook user clicks on a link to your website, a unique FBCLID is created and appended to the URL.
They operate like UTMs, but these are specific to Facebook clicks and, thus, require slightly different tracking and attribution tactics.
It’s also important to note that since Facebook, otherwise known as Meta, now owns Instagram—FBCLIDs are also present on outgoing links from Instagram as well!
Why Did Facebook Create FBCLIDs?
The why behind Facebook creating FBCLIDs is a little unclear. They were launched in mid-October 2018 with no official documentation or announcement.
Many have concluded they were created as a workaround for ad blockers and Apple’s ITP (Intelligent Tracking Prevention) in its Safari browser.
ITP is Apple’s way of coming down on third-party cookies, which is a contentious topic regarding traffic attribution. While no one knows for sure, those are both likely reasons for the creation of FBCLIDs and their appearance in your Google Analytics.
What Does This Mean For My Google Analytics?
Well, it’s not great. You may have noticed quite a few pagepaths being created with the unique FBCLID parameter in your Google Analytics.
These are created every time someone is referred to your site from Facebook/Instagram. They’re created because Google thinks every click on your Facebook/Instagram referral link is an entirely new pagepath.
Before FBCLIDs, Google would attribute multiple clicks to one pagepath; but they’re now splitting those clicks into multiple pagepaths.
If you have a particularly highly clicked link, this will definitely cause some headaches for attributing your traffic. Agencies having to comb through multiple clients’ data will have an especially hard time differentiating pagepaths.
This is the difference between your standard UTM tracking parameters and FBCLIDs. With UTMs, once you’ve created one for a specific campaign, all traffic/clicks/etc. are automatically attributed to the single tag, and your data remains neat and tidy.
But with FBCLIDs, each click gets its own unique parameter resulting in hundreds or thousands of duplicate URLs cluttering your Google Analytics dashboard.


What’s The Solution?
Unfortunately, there isn’t a straightforward solution within your analytics reporting for correcting the numerous URLs that will appear. Google Analytics doesn’t let you retroactively edit your data, so analytics created with the FBCLID are there to stay.
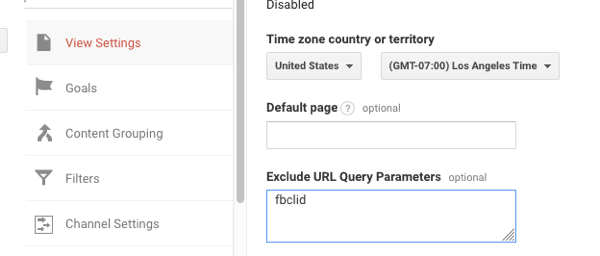
There is hope for the future, though, because you can prevent them from further creating pathways in your analytics by excluding the parameters in your settings.
You can do this by going to ‘View Settings’ and adding “fbclid” to the ‘Exclude URL Query Parameter’ section. If you have a parameter in there already, remember to separate it with a comma before adding this one in.
Going forward, that will help you keep your Google Analytics dashboard tidier, making it easier to read your analytics and make data-driven decisions about marketing campaigns.

Welcome To The World Of UTMs
UTM (Urchin Tracking Module) codes are variables that you append to a URL in order to track various parameters. Specifically, they allow you to track five parameters regarding where traffic originated from: campaign, medium, source, term, and content.
- Campaign: This parameter is specifically for the campaign the visitor engages with. It groups all the content from one campaign in your analytics.
- For example, utm_campaign=blog_post
- Medium: This specifies the general channel type that the visitor came from
- For example, utm_medium=social
- Source: This specifies the website the visitor came from
- For example, utm_source=facebook
- Term: This will tell you the actual keyword or term you bid on in Google Ads that drove the click
- For example, utm_term=marketing+tips
- Content: This tells you the specific type of content clicked through if you have multiple types from the same source and medium, resulting in several identical links on a page. Content as a UTM parameter is commonly used in pay-per-click (PPC) campaigns.
- For example, utm_content=image versus utm_content=sidebar_link
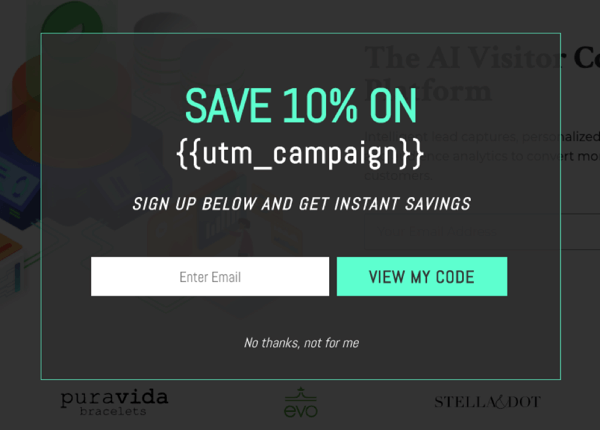
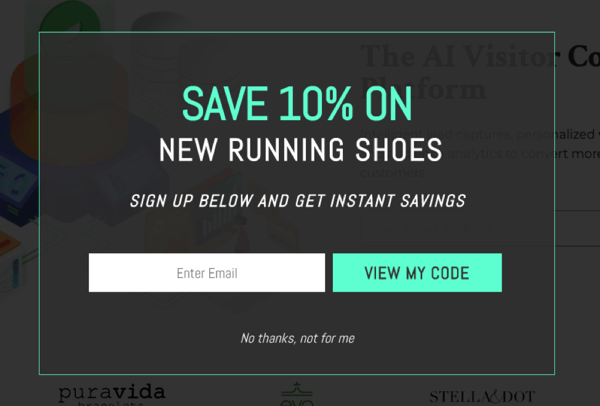
Adding these UTM variables onto your URLs won’t change the content on the page itself. They’re meant to act as a way for analytics programs to know where arriving traffic came from. But you can trigger personalized website experiences for these segments using Justuno. UTM-based targeting will create increasingly personalized experiences that convert more visitors from all your marketing efforts, like SMS sends, email flows, ad campaigns, and more.
UTMs, Justuno, and Audience Targeting
Now that you know where your traffic is coming from, creating hyper-personalized website experiences for that audience is a breeze.
You can not only use UTMs to target who will see your promotions but also use them to customize the content of those promotions as well.
This means you can use a single promotion for multiple audiences, helping you keep the number of pop-ups needed to a minimum.
Pro Tip: Learn more about how Legacybox used Justuno UTM-targeting to consolidate their pop-ups from 150 to 20!
For example, you can customize the copy a visitor will see since Justuno will automatically fill in the source, term, content, medium, and even coupon code—into a promotion, depending on your UTM settings.
If you’re already a Justuno customer, use these instructions to implement this strategy.


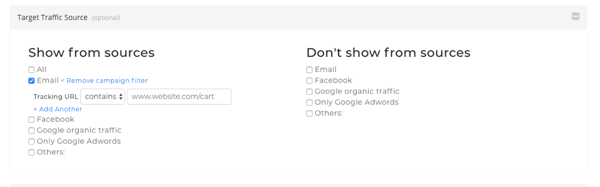
You can also target UTM URLs in your rules. In Justuno’s basic rule sets, you can choose the source traffic you’d like to target or exclude and add specific campaigns to each source.
Justuno customers can learn more about targeting rule sets with UTMs in our support portal, or take a look at this course in the Justuno Academy on how to use UTM parameters in conjunction with email campaigns to reflect inbox messaging on your website.

Best Practices For Using
If you’re ready to start creating & using UTMs more often, keep these best practices in mind:
- Keep URLs consistent, clean, and easy to understand. We recommend creating a document outlining your brand’s standard for UTMs to ensure consistency in naming & style.
- Try to stick with all upper or lower-case words; UTM codes are case-sensitive.
- Keep names short but still specific and descriptive.
- Create dashboards throughout your MarTech stack (ESP, SMS, CRM, etc.) to monitor the performance of various campaigns.
Final Thoughts
TikTok & Facebook are likely some of your biggest traffic drivers, depending on your industry and marketing strategy. Understanding how to use TTCLIDs and FBCLIDs, what they can mean for your campaign/budget planning, plus how to understand their analytics is key to making sure you’re getting the most out of your efforts.
Not to mention the improved customer experience that visitors from email and SMS campaigns can have when you start implementing UTM-specific website experiences.
But at the end of the day, while TTCLIDs, FBCLIDs, and UTMs have slightly different functions—the strategy behind effectively using tracking parameters is ultimately the same. Proper traffic attribution, plus advanced targeting rules, equals more personalized experiences & streamlined promotional efforts.
Start a free 14-day trial of Justuno to get started with UTM-based targeting, so you can sit back and watch the conversions roll in.